Happy Sunday! I hope this finds you well and with a little time to be creative today :). It’s the 18th, and that means a mini challenge over on the Mercy Tiara 27-Day Scrappy challenge Facebook group. In keeping with the main challenge this month to create our own backgrounds, the mini challenge is to create that background with watercolours and stamps, or rub-ons.
My initial idea was to use this month’s Creative Scrappers sketch (no. 298), and that is where I got the inspiration for the large circles on the background … but alas, the similarity to the sketch ends there LOL.
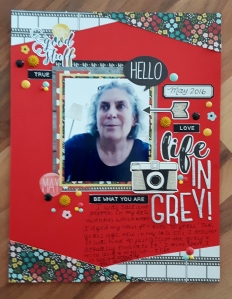
I started with plain white cardstock to which I applied gesso to prime the surface. I then used two plates, and a black marker, to draw the large circles. I put stiched lines for added interest on two of the circles.


I have a set of inexpensive watercolour pencils from Staedtler, which has been neglected and lonely in my stash for years so I decided to dig them out and play. They work a charm. I worked section by section, scribbling with the pencils, without much thought except to apply a somewhat thicker line around the edges. I used a waterbrush to begin pulling the colour away from the edges and into the different areas of each section. I soon tired of the waterbrush – it works beautifully but I found the tip too fine and small for this particular background. So I got a larger, round tip, brush and went to town. Oh what fun 🙂 🙂 .
I then wanted to create a floral pattern in the smaller circle, so I chose stamps in various sizes – some outline stamps and some full stamps. I used an archival black ink to stamp the outline stamps. I thought I would try using my stamps pads and water to mimick watercolour since I know that not everyone has watercolours. You can see where I tested the technique on the left hand side in the photo below (I knew my photo would be going there on the final layout). It worked beautifully. The gesso seems to be the key to getting a good blend and flow from the stamping ink. I used Stampin’ Up inks, as well as one Hero Arts Ink , in Pale Tomato. I tried the technique on unprimed cardstock, and it does not really work.


I dipped my paint brush in water and put it directly on the stamp pad and then coloured, and shaded, the outline flowers – it does not harm the stamp pad in any way and really works very well. Just make sure you clean the brush in water when changing colours. I then used a fine tipped water brush to smooth out the pansy type stamped flowers (the full stamp, without a black outline). I let everything dry before making my final layout :

I had such fun making this layout; it did take a fair amount of time, probably about three hours in all, but I got totally lost in the process! Scrap-therapy at it’s best 🙂 🙂 I hope you will consider using this technique to create one of your backgrounds for this month’s challenge. As you can see, no elaborate, or expensive tools are needed and no drawing skills are required either LOL.
Thanks so much for joining me today, and if you do try this mini challenge, please share your project with us over on the Facebook group. If you have any questions, please don’t hesitate to ask – either by leaving a comment here or over on the group. Happy creating !

Great tutorial Moira! Hurray for your blog!!
LikeLike
Thanks so much Karen for taking the time to visit and leave a comment !! I had been receiving quite a few questions and since my technological skills do not extend to video making LOL, I thought I would at least give blogging a try! I hope you are having a great Sunday 🙂
LikeLike
Lovely step by step. I really like that it sounds like a conversation when you write!
LikeLike
thanks so much for stopping by Chery and taking the time to leave such a lovely comment! I particularly appreciate it as a conversational tone was my aim 🙂 🙂 Have a great Monday!
LikeLike
wow i just this deal my printer working now. after five pm im going to work on this. just neat
LikeLike
Hi Bonnie, thanks so much for stopping by and I am happy it may be helpful! Can’t wait to see what you create 🙂
LikeLike